close
Choose Your Site
Global
Social Media

Views: 0 Author: Site Editor Publish Time: 2026-06-04 Origin: Site
Tile installation remains a high-stakes precision task. Fractional layout errors compound quickly across a large room. These tiny shifts lead to severe lippage. They also create ugly, out-of-square grout lines. Traditional bubble levels fall short during complex jobs. Chalk lines simply cannot handle modern large-format tiles. They struggle across complex, multi-plane room layouts. Water from wet saws often washes away chalk reference marks. Thinset easily covers your physical floor lines. Contractors need modern tools for flawless execution.
Our goal here is straightforward and highly practical. We provide an objective, evidence-based evaluation framework. This guide helps contractors and serious DIYers select dependable tools. You need equipment delivering reliable accuracy and robust jobsite durability. Proper layout efficiency defines every successful tile project. We want you to choose a unit ensuring perfect grid alignments.
Table of Contents
Beam Visibility: Green lasers offer up to 4x better visibility than red lasers, essential for well-lit rooms, though they consume significantly more battery power.
Projection Type: 360-degree multi-line (3D) lasers are the current standard for full-room squaring and plumb/level alignment.
Micro-Adjustments matter: A rigid, non-drifting fine-adjustment base is non-negotiable for dialing in exact grout line placement.
Jobsite Survivability: Look for a locked pendulum feature for transit and a minimum IP54 rating to withstand silica dust and wet-saw moisture.
Manual squaring methods drain your daily profitability immensely. Snapping chalk lines consumes valuable morning prep time. Measuring multiple triangles repeatedly introduces human error continually. Time spent establishing a square layout limits your actual tiling hours. A precise tool changes your workflow fundamentally. You stop second-guessing your initial reference marks. The light provides a constant, undeniable truth across the room. You can measure from the beam directly to the wall. This shows exactly how much the wall bows inward. You then adjust your starting grid accordingly. Professional tile setters rely on this absolute certainty.
Using a reliable Laser Level solves these critical layout problems completely. You eliminate costly mistakes before spreading any thinset. We define very specific success criteria for tile lasers.
Must project a true 90-degree angle perfectly across floor grids.
Must project lines low enough to the ground. This guarantees beams clear thick mortar beds easily.
Must maintain internal calibration despite heavy jobsite vibrations.
You cannot afford tools shifting out of square mid-installation. Jobsite floors shake constantly from heavy footsteps. Compressors and saws create intense background vibrations. A proper tile tool ignores these external factors entirely.
Understanding different tool categories helps you match equipment to projects. Different installations demand specific beam configurations. We break down the core solutions below.
These specialized units sit entirely flat on the subfloor. They project a crisp 90-degree crosshair directly onto the working surface. We find them highly effective for basic flat floor work. They also handle simple kitchen backsplashes quite well. Use them for smaller, single-plane jobs exclusively. They do not project lines high up onto vertical walls. This makes them less versatile for complex bathroom builds.
These popular devices project intersecting vertical and horizontal lines. They shoot bright beams directly onto facing walls. Contractors rely heavily on them for tub surrounds. They work perfectly for custom showers and basic wall tile installations. You position them on tripods or wall mounts easily. They establish perfect vertical plumb lines for wall tile stacking. These units often come equipped alongside magnetic brackets. You attach them directly to metal drywall studs securely. You can also screw them into temporary wooden blocking. This versatility makes them incredibly popular among residential remodelers.
Modern multi-line units represent the current professional industry standard. They project continuous planes of light around the entire room. You typically get two vertical planes and one horizontal plane. Professionals use them for extensive, full-room layouts. They ensure floor joints align perfectly with wall joints. This creates a seamless visual grid across multiple surfaces.
Laser Type | How They Work | Best Application |
|---|---|---|
Dedicated Floor Lasers | Project a 90-degree crosshair directly on the subfloor. | Flat floor work, backsplashes, and smaller single-plane jobs. |
Cross-Line Lasers | Project intersecting vertical and horizontal lines on walls. | Tub surrounds, showers, and wall tile installations. |
360-Degree Multi-Line Lasers | Project continuous planes of light around the entire room. | Professional full-room layouts, aligning floor and wall joints perfectly. |
Evaluating hardware requires looking far beyond basic marketing claims. You must connect specific technical features to actual jobsite outcomes. We evaluate four critical dimensions before recommending any tool.
Green lasers offer visually superior performance in ambient daytime light. They appear up to four times brighter to the human eye. You can see green beams clearly across sunlit rooms.
Users must accept a specific trade-off, however. Green diodes carry a significantly higher upfront purchase cost. They also drain batteries much faster than standard diodes. Red lasers remain highly cost-effective for everyday use. They work incredibly well for enclosed, dim spaces. If you primarily tile windowless bathrooms, red beams suffice perfectly.
Precision dictates the ultimate success of your tile grid. Accept nothing less than ±1/8-inch accuracy at 30 feet. Any larger variance creates noticeable lippage over long spans. Laser beams shoot perfectly straight naturally. However, the internal pendulum housing dictates the starting angle. If this housing suffers damage, the line projects diagonally. Even a tiny fraction of a degree ruins a floor. At thirty feet, a slight internal error becomes a massive gap. This gap forces you to widen your grout lines noticeably. You lose the crisp, professional aesthetic entirely.
Feature check: Always look for a rapid self-leveling pendulum system. It needs a clear visual or auditory out-of-level indicator. The beams should blink rapidly if the unit sits unevenly. This crucial warning prevents you from following a skewed line blindly.
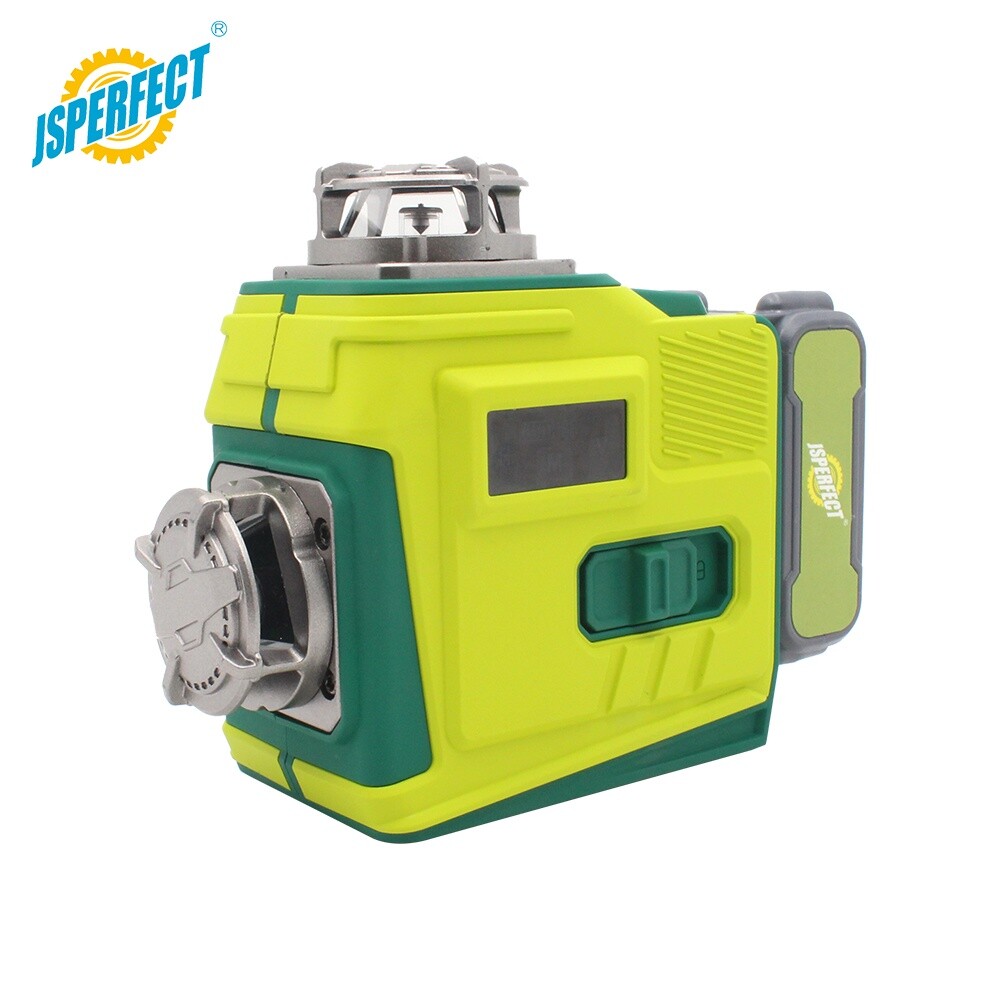
The optical unit relies entirely on its foundational base. Assess the micro-adjustment knob carefully before buying. Look for any unwanted "play" or internal gear drift.
Cheap plastic gears shift the layout line when you step away.
Solid metal gears hold your exact measurements firmly.
A rigid, non-drifting fine-adjustment base proves absolutely non-negotiable.
Clearance matters significantly for floor layout tasks. Assess how close the bottom horizontal beam sits to the floor. Ideally, it should rest within 3/8-inch to 1/2-inch of the substrate. This height clears standard mortar beds perfectly.
Tile environments present incredibly harsh conditions for sensitive electronics. Silica dust and water splashes happen constantly during shifts. A minimum IP54 rating stands as a strict jobsite requirement. This specific rating guarantees baseline dust and splash resistance. The tool must survive airborne thinset dust clouds safely. It also needs to withstand accidental wet-saw moisture spray. Professional tools seal internal components away from these daily hazards securely.
Field conditions frequently challenge even the best technical specifications. Understanding these daily realities prevents frustrating project delays. We highlight three major implementation risks below.
Green beams demand immense amounts of electrical power continuously. They will kill standard alkaline batteries easily mid-shift. Running out of power during a complex layout wastes hours. High-use professionals require high-capacity Lithium-ion battery packs. These advanced batteries handle the intense draw of green diodes easily.
Ideally, look for models featuring USB-C pass-through charging capabilities. This clever feature allows you to run the unit while plugged in. You never have to stop working due to a dead battery. Some professionals carry three battery packs daily. One sits in the laser working actively. One stays on the charger continuously. The third acts as an emergency backup. This rotation ensures you never lose layout capabilities.
Transit impact ruins precision tools more than any other factor. It remains the most common reason a unit loses calibration. Bouncing around in a truck bed destroys sensitive internal pendulums. Ensure your selected model features a mechanical pendulum lock. This physical switch secures the heavy diode mechanism firmly. You must engage this lock every time you power the unit off. This simple habit extends the lifespan of your tool dramatically.
You should never trust factory calibration out of the box. Shipping drops and warehouse mishandling happen constantly. Best practice dictates performing a baseline 180-degree rotation test immediately.
Set the unit up exactly 15 feet from a blank wall. Mark the beam location clearly using a sharp pencil. Rotate the unit exactly 180 degrees on its tripod. Check the new beam location against your original pencil mark. Do this before starting any major tile layout. This quick test verifies true accuracy instantly.
Choosing the right tool ultimately comes down to your specific workload. We categorize our purchasing logic into two distinct user profiles.
You likely do not need an expensive multi-line unit. Prioritize an entry-level cross-line tool instead. A basic floor square layout laser also handles DIY jobs beautifully. Accept standard AA batteries to avoid expensive proprietary chargers. Choose red beams to keep your initial costs remarkably low. Red diodes provide plenty of visibility for typical residential bathroom renovations. This logical approach saves money while still improving layout accuracy.
Professionals face entirely different daily efficiency demands. Time spent wrestling with limited tools costs actual money. Prioritize a 3D or 360-degree green laser immediately. You need a rugged micro-adjust base for fast alignment tweaks. Lithium-ion batteries remain mandatory for your heavy daily workload. Demand an IP54 or higher rating to protect your capital investment.
Next steps before buying: Verify the manufacturer's warranty policies carefully. Check their internal calibration and repair services closely. You need a brand offering fast turnaround times for broken tools. Consider buying a backup unit if you run a large crew.
Selecting the perfect layout tool requires careful feature balancing. You must weigh beam visibility against battery consumption reality. You need to balance line configuration against mechanical durability limits. Your specific project volume ultimately dictates the final hardware choice.
Investing in a reliable, micro-adjustable green beam unit pays off quickly. It eliminates manual layout guesswork entirely from your workflow. It prevents costly tile tear-outs resulting from skewed grid lines. Ultimately, the right equipment significantly reduces your total installation time. Better tools lead directly to better, more profitable finished tile floors.
A: Only if the laser has a dedicated "pulse mode" enabled. You must pair it with a compatible laser receiver or detector. Human eyes cannot see even the brightest green laser beams in direct, natural sunlight. The electronic detector picks up the pulsed beam invisibly. It gives you a clear auditory signal when you find level. Do not attempt outdoor layouts without this specific receiver equipment.
A: Most top-tier models utilize bottom-mounted diodes specifically for flooring applications. These specialized units can project a beam within 3/8-inch to 1/2-inch of the subfloor. This ultra-low clearance proves ideal for tile work. It perfectly clears standard tile thicknesses and typical thinset mortar beds. Higher-mounted diodes often project lines too high, making accurate floor grid alignment extremely difficult.
A: Continuous blinking indicates a specific out-of-level error state. The unit currently sits on a surface exceeding its automatic compensation range. This range typically handles inclines between ±3 to 4 degrees. The internal pendulum physically cannot correct the angle anymore. You must manually adjust the base or tripod closer to true level. Once reasonably flat, the blinking stops and the pendulum settles perfectly.